
it is for a FAN, of which i was inspired by altered antiquity
WAS IT WORTH THE WAIT LOL
This finished fan, is done in the shabby chic style, but you can let your imagination run riot with this. Can you imagine a Zetti Fan, oh boy, i can. lol
So the first stage is to cut out this template 6 times. I used a cereal box, as they are quite sturdy. They are approximaely 6" in height, but you can easily adapt this to your chosen size.

Next i covered each piece of card, both back and front, using a variety of materials.
For the front i used vintage music sheets, and text, which i ripped and collaged on to the card. I then stamped various swirls, in a haphazard way, with pink acrylic paint. Again you can do exactly what you wish. I then gave a light coating of walnut ink crystals, but this is not really necessary.
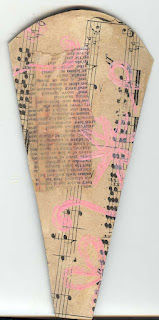
For the front i used vintage music sheets, and text, which i ripped and collaged on to the card. I then stamped various swirls, in a haphazard way, with pink acrylic paint. Again you can do exactly what you wish. I then gave a light coating of walnut ink crystals, but this is not really necessary.

For the back I used different papers, and used pink tissue paper torn and collaged along with text paper.


Again i gave it a light coating with walnut ink crystals. I then added a dusky pink paper heart in the centre (which you cannot see here)

-
for the next stage i added lace to the top edge, which I had dyed with tea, along with a spotty edging done with a sakura gel pen
With the next stage i added more embellishments, and distressed the edges. Plus using a brown pencil, I outlined the pink acrylic stampings. This gives more depth i feel.
 In the above photo, you can just about see where i've marked the position to make a hole for the brad. I did in fact use a paper fastener, as this is better coping with the thickness of the fan.
I tea dyed a piece of a crochet doily to form a flower, and added luscious fibres and a ribbon, all tied on to the fastener.I then glued a flower and a gem on top of the fastener.
You could leave the fan as it is, but it won't be very stable.
There are two ways to overcome this.
The first way, is to fan the pieces out to the desired shape, and glue together where they touch,
Or in my case, i have made it so that it can open and fold up.
To do this. Open the fan trying not to leave any gaps in between each piece.
Take a length of ribbon, and glue only to the centre of each piece, ,preferably with a hot gun, for fast results.
The tea stained doiley is far too dark for my taste, so i will eventually tone this down with dusky pink acrylic paint.

If you make one yourself, tell us here, so that we can link to your photo.

I tea dyed a piece of a crochet doily to form a flower, and added luscious fibres and a ribbon, all tied on to the fastener.I then glued a flower and a gem on top of the fastener.
You could leave the fan as it is, but it won't be very stable.
There are two ways to overcome this.
The first way, is to fan the pieces out to the desired shape, and glue together where they touch,
Or in my case, i have made it so that it can open and fold up.
To do this. Open the fan trying not to leave any gaps in between each piece.
Take a length of ribbon, and glue only to the centre of each piece, ,preferably with a hot gun, for fast results.
The tea stained doiley is far too dark for my taste, so i will eventually tone this down with dusky pink acrylic paint.
VOILA - ONE SHABBY CHIC FOLDING FAN.


14 comments:
Your fan looks so great, too! And thank you for the tutorial!! :-)
Margaret - the fan is 'fantastic' (sorry) seriously it's lovely - must have a go at that - will add it to my list - maureen x
Cool project! thanks for posting it
Ohh la la-me likey,thanks Margaret xx
I love it Margaret x
Incredible!You are talent I wish I could be! Perhaps I'll try this!!
lovely work and thanks for Tutorial will have a go
this is GREAT!!!!thank you for a fantastic tutorial!:0)
Thankyou everybody. I wasn't sure if anyone would like it. So glad you do.
xxxx
Thanks darling - as usual you are a gem to share your wonderful talents xx
This was a fantastic read, I loved how you did it. Thanks for sharing the tutorial.
Wow! Your fan looks great, and thank you for posting the tutorial.
Love your fan Margaret and many thanks for the tutorial my friend!
Your fan is beautiful !
Rini - the Netherlands
Post a Comment